|
查看: 6370|回复: 16
|
浅谈Isometric Tile Engine的原理(VC# + XNAGS)
[复制链接]
|
|
|

楼主 |
发表于 7-2-2011 03:08 PM
|
显示全部楼层
接下来是在 Initialize() 里面设定图像的起始位置:- protected override void Initialize()
- {
- // TODO: Add your initialization logic here
- position = Vector2.Zero;
- base.Initialize();
- }
- protected override void LoadContent()
- {
- // Create a new SpriteBatch, which can be used to draw textures.
- spriteBatch = new SpriteBatch(GraphicsDevice);
- txt_floor = Content.Load<Texture2D>("1x1_floor_green");
- // TODO: use this.Content to load your game content here
- }
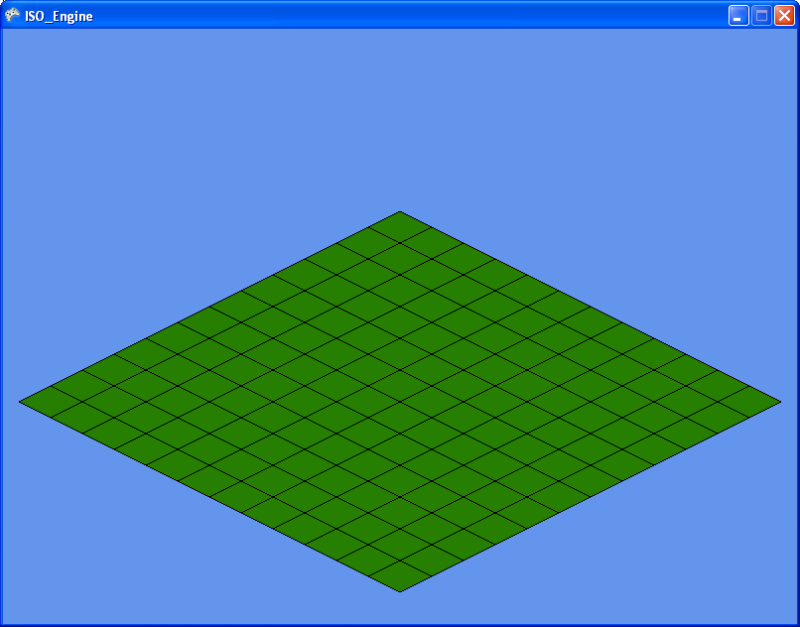
接下来是大家都喜欢的,也就是画面输出。- protected override void Draw(GameTime gameTime)
- {
- GraphicsDevice.Clear(Color.CornflowerBlue);
- // TODO: Add your drawing code here
- spriteBatch.Begin(SpriteBlendMode.AlphaBlend);
- {
- spriteBatch.Draw(txt_floor, position, Color.White);
- }
- spriteBatch.End();
- base.Draw(gameTime);
- }
 )的图像则由Texture(以及其家族成员,例如Texture2D)提供。简而言之,SpriteBatch 就是批次量的把Texture里的图画贴在游戏画面里,就酱。 )的图像则由Texture(以及其家族成员,例如Texture2D)提供。简而言之,SpriteBatch 就是批次量的把Texture里的图画贴在游戏画面里,就酱。
在使用spriteBatch描绘图像前,要记得呼叫SpriteBatch.Begin(),这是为了锁定游戏画面(显示卡内存)以免被其他程式介入,造成冲突和搅乱,毕竟这是Windows OS,多工处理环境,大家都要用显示卡内存来输出画面,不锁定的话就会大乱了。Begin()里面标明SpriteBelndMode.AlphaBlend是告诉显示卡,所有的Sprite都要使用Alpha Channel来达成去底效果,也就是透明底色。
接下来就是用SpriteBatch.Draw()来描绘Sprite。这个Method有很多个变化,我采用的是最简单的那个。Texture自然是图像来源,也就是我们的那个地板图像的Texture。Vector2 是我们的图像位子,也就是(0,0),画面的左上角。Color 是渲染色调。Color.White是没有变化,换成其他颜色的话就会把你的图像染上该颜色,自己玩玩吧。
输出:

要注意的是,图像是以其左上角对准position的X和Y。有时你会想以图像中心来对position,这点并不难达到,只需在设定position时往右下角移动适当的像素距离就行了。
在描绘完之后,记得用SpriteBatch.End()来解放被锁定的显卡内存。
但是这只是单单一个地板图像而已,要如何描绘更多的地板呢?
且看下回分解。
《待续》 |
|
|
|
|
|
|
|
|
|
|
|
楼主 |
发表于 7-2-2011 03:52 PM
|
显示全部楼层
|
|
|
|
|
|
|
|
|
|
|
楼主 |
发表于 7-2-2011 04:15 PM
|
显示全部楼层
单单只是描画地板很枯燥。我们来画屋子~
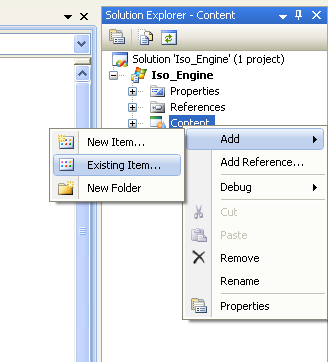
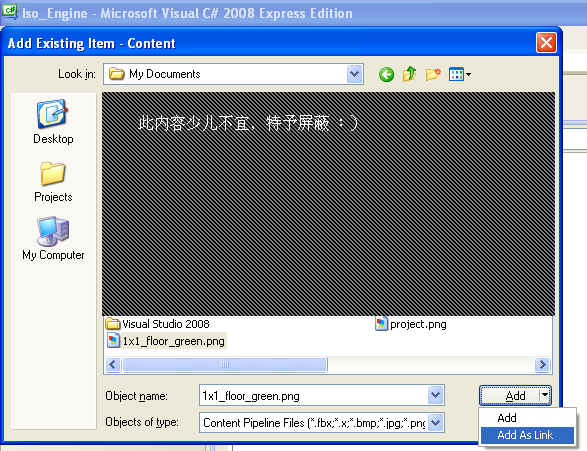
再次用Paint.Net画出这个简单的屋子(或者直接在这帖子里save下那些图画),依据上面所描述的方式,把这个屋子加入在Content 里面。然后再加入相关的Texture2D的宣告。

很可爱吧?
再次参考上面的步骤,载入这个图像于相关的Texture2D里面。
接下来是在每个地板上面加上屋子:- for (int y = 0; y < max_y; y++)
- {
- pos.X = (GraphicsDevice.Viewport.Width / 2) + ((x - y) * 32) - 32;
- pos.Y = (GraphicsDevice.Viewport.Height / 3) + ((y + x) * 16) - 16;
- spriteBatch.Draw(txt_floor, pos, Color.White);
- pos.Y -= 32; //加入这行
- spriteBatch.Draw(txt_building, pos, Color.White); //还有这行
- }
再来,就是显示鼠标。你可以选择硬体鼠标(也就是Windows提供的那个)或者是软体鼠标。因为XNAGS预设是把鼠标给隐藏起来的,我也懒得去找如何显示鼠标的方式,就干脆使用软体鼠标,也就是说,自己画鼠标。
画出这个鼠标(或者任何你喜欢的图画,但是记得别选太大的图像):

再次重复之前的步骤,把这个鼠标图案加入在Content里面,宣告Texture2D,载入图像,顺便宣告另一个Vector2,作为鼠标位置的寄存。
然后在游戏的Update()函式里读取鼠标位置,存进鼠标位置的Vector2里面。
最后在完成渲染地板和屋子的程序后,根据鼠标位置画上鼠标图像。
完整的代码:- using System;
- using System.Collections.Generic;
- using System.Linq;
- using Microsoft.Xna.Framework;
- using Microsoft.Xna.Framework.Audio;
- using Microsoft.Xna.Framework.Content;
- using Microsoft.Xna.Framework.GamerServices;
- using Microsoft.Xna.Framework.Graphics;
- using Microsoft.Xna.Framework.Input;
- using Microsoft.Xna.Framework.Media;
- using Microsoft.Xna.Framework.Net;
- using Microsoft.Xna.Framework.Storage;
- namespace ISO_Engine
- {
- /// <summary>
- /// This is the main type for your game
- /// </summary>
- public class Game1 : Microsoft.Xna.Framework.Game
- {
- GraphicsDeviceManager graphics;
- SpriteBatch spriteBatch;
- Texture2D txt_floor, txt_building, txt_cursor;
- Vector2 pos = Vector2.Zero, cur_pos = Vector2.Zero;
- const int max_x = 12, max_y = 12;
- public Game1()
- {
- graphics = new GraphicsDeviceManager(this);
- Content.RootDirectory = "Content";
- }
- /// <summary>
- /// Allows the game to perform any initialization it needs to before starting to run.
- /// This is where it can query for any required services and load any non-graphic
- /// related content. Calling base.Initialize will enumerate through any components
- /// and initialize them as well.
- /// </summary>
- protected override void Initialize()
- {
- // TODO: Add your initialization logic here
-
- base.Initialize();
- }
- /// <summary>
- /// LoadContent will be called once per game and is the place to load
- /// all of your content.
- /// </summary>
- protected override void LoadContent()
- {
- // Create a new SpriteBatch, which can be used to draw textures.
- spriteBatch = new SpriteBatch(GraphicsDevice);
- // TODO: use this.Content to load your game content here
- txt_floor = Content.Load<Texture2D>("floor_green");
- txt_building = Content.Load<Texture2D>("house");
- txt_cursor = Content.Load<Texture2D>("cursor");
- }
- /// <summary>
- /// UnloadContent will be called once per game and is the place to unload
- /// all content.
- /// </summary>
- protected override void UnloadContent()
- {
- // TODO: Unload any non ContentManager content here
- }
- /// <summary>
- /// Allows the game to run logic such as updating the world,
- /// checking for collisions, gathering input, and playing audio.
- /// </summary>
- /// <param name="gameTime">Provides a snapshot of timing values.</param>
- protected override void Update(GameTime gameTime)
- {
- // Allows the game to exit
- if (GamePad.GetState(PlayerIndex.One).Buttons.Back == ButtonState.Pressed || Keyboard.GetState().IsKeyDown(Keys.Escape))
- this.Exit();
- // TODO: Add your update logic here
- cur_pos.X = Mouse.GetState().X;
- cur_pos.Y = Mouse.GetState().Y;
- base.Update(gameTime);
- }
- /// <summary>
- /// This is called when the game should draw itself.
- /// </summary>
- /// <param name="gameTime">Provides a snapshot of timing values.</param>
- protected override void Draw(GameTime gameTime)
- {
- GraphicsDevice.Clear(Color.CornflowerBlue);
- // TODO: Add your drawing code here
- spriteBatch.Begin(SpriteBlendMode.AlphaBlend);
- {
- for (int x = 0; x < max_x; x++)
- {
- for (int y = 0; y < max_y; y++)
- {
- pos.X = (GraphicsDevice.Viewport.Width / 2) + ((x - y) * 32) - 32;
- pos.Y = (GraphicsDevice.Viewport.Height / 3) + ((y + x) * 16) - 16;
- spriteBatch.Draw(txt_floor, pos, Color.White);
- pos.Y -= 32;
- spriteBatch.Draw(txt_building, pos, Color.White);
- }
- }
- spriteBatch.Draw(txt_cursor, cur_pos, Color.White);
- }
- spriteBatch.End();
- base.Draw(gameTime);
- }
- }
- }
《还要继续吗?》 |
|
|
|
|
|
|
|
|
|
|
|
 发表于 9-2-2011 10:38 PM
|
显示全部楼层
发表于 9-2-2011 10:38 PM
|
显示全部楼层
本帖最后由 megablue 于 9-2-2011 10:40 PM 编辑
有研究过  我有使用Javascript来写的简单的Isometric引擎 我有使用Javascript来写的简单的Isometric引擎
不过碰到了一些难题就搁着了
之前想到的问题是,
问题1,就是layers之间重叠的问题,如一个人(高1x 宽1 长x1) 走到 一间 (高2x 宽1 长x1) 的建筑物的后面时,该如何实现?
问题2, 一个人穿越一道中间有空洞的门栏,又该如何实现? |
|
|
|
|
|
|
|
|
|
|
|
楼主 |
发表于 10-2-2011 02:48 AM
|
显示全部楼层
本帖最后由 geekman 于 10-2-2011 03:04 AM 编辑
1)如果是根据我上面所说的tile based ISO 设计,每个单位都占据一个四方格(1x1 floor),那么站在地上的人就会被当作和建筑物一般处理(参开上面程式码里的方式),也就是先画地板,然后画建筑物/人物/汽车/其他占据该格子的物体,那么遮盖的问题就不应该存在。或者你可以尝试把有问题情况描述和画面贴上来,我试试看能否帮你解决。如果你的问题指的是在格子与格子间穿行(smooth transition from tile to tile)那就另当别论了。事实上,就算是smooth transition也不会受建筑物的高度影响,反而是非正方形物体(1x2或者2x3之类的)才是比较麻烦的。
2)将拱门分拆。
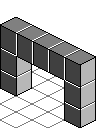
分拆成如下:
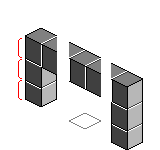
(请原谅图片的简陋,已经半夜了,而画Iso图片真的很耗时。。。)
每一个地板将容纳3层的物体(以红线标示),画完地板接着画最底下一层的柱子/物体,然后第二层,。。。然后第N层。中间那个格子(地板)就是人物所站的地方,也就是说横梁会覆盖在人物的头上。
----分割线----
到目前为止,我采用的都是以地板为主的描绘方式,也就是说,先画地板,然后画第一层的物体,然后再画第二层的物体。。。画第N层的物体,然后画第二片地板。。。第N片地板。这种做法并不适合让人物在地板间流畅的移动,而是会从一格跳到另一格地板。如果要做到流畅的移动动画,旧的采取由下到上的分层描绘方式,也就是先描绘所有的地板,然后描绘所有的第二层物体,然后描绘所有的第三层物体。。。以此类推。两者之间的差别在于如何储存整个世界的物件,以适应所采用的描绘方式。
网上有几个挺著名的Iso Engine Project,就是模仿Fallout 1 & 2的Iso Engine的,你可以向谷歌大神查询一下,里面应该有更详细的解说smooth tile transition的。 |
|
|
|
|
|
|
|
|
|
|
|
楼主 |
发表于 31-5-2011 03:20 PM
|
显示全部楼层
本帖最后由 geekman 于 31-5-2011 03:54 PM 编辑
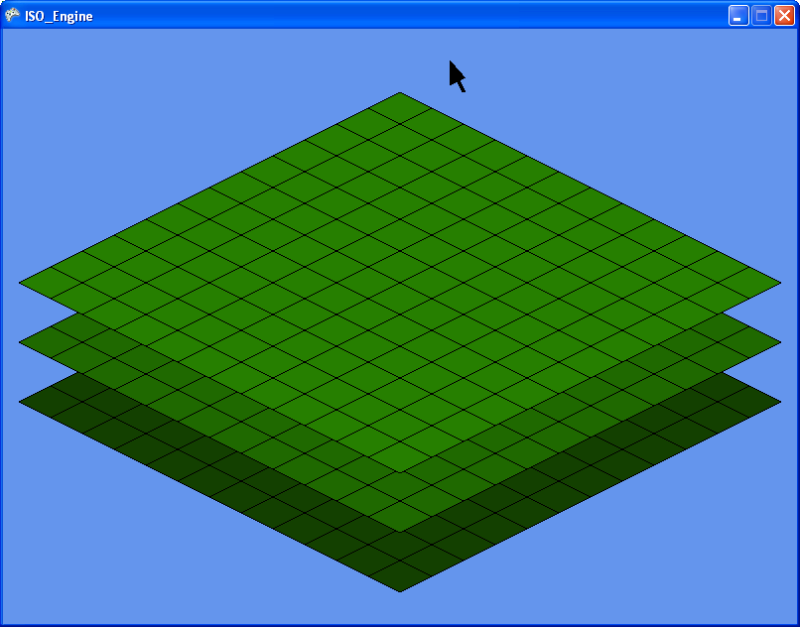
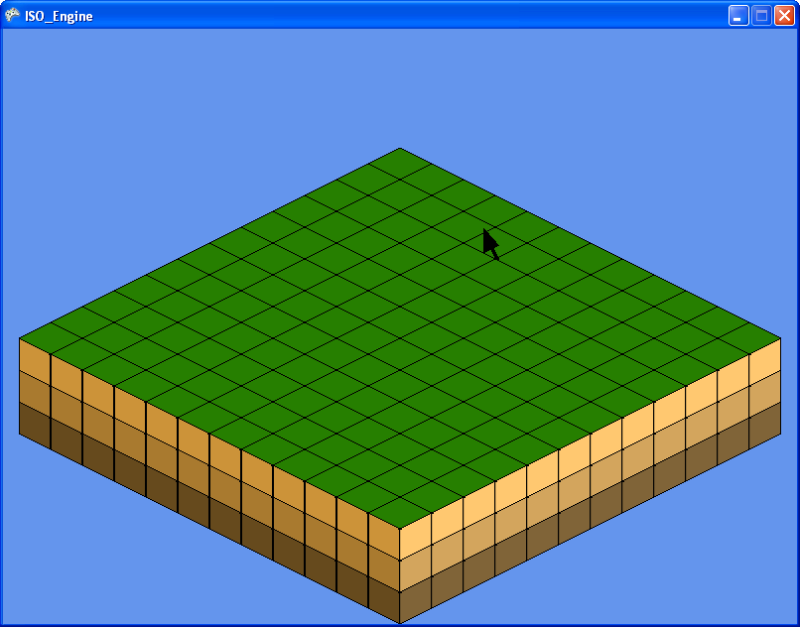
目前正在改善这个ISO引擎,增加了Layers支援,并且加入了Cell class以提供在每个Cell里面放置物体(可重叠)的功能,测试完毕后将把结果和代码贴上来。
预览:
 |
|
|
|
|
|
|
|
|
|
|
|
楼主 |
发表于 2-6-2011 10:35 AM
|
显示全部楼层
本帖最后由 geekman 于 2-6-2011 10:52 AM 编辑
我可是已经累积了十多年的经验的。想当初在 C++ Builder 1.0 的年代,我也是望着 C++ Builder 的 IDE 干瞪眼,无从下手。读书时花了一个学期每天一下课就泡在Computer Lab到晚上9点,足足四个月从不间断,这其中的血汗又有谁人知?结果从DOS时代迁移到Win32时代,一切归零,从新回到什么也不懂的状态。过后死抱着Documentation和参考书天天刨到半夜,才有今天的成果。台前风光,幕后清光啊。 |
|
|
|
|
|
|
|
|
|
|
|
楼主 |
发表于 7-6-2011 02:25 PM
|
显示全部楼层
本帖最后由 geekman 于 7-6-2011 02:30 PM 编辑
到目前为止的代码,接下来要做一个Map Editor/Tile Manager的软件,用来设计地图用的。- using System;
- using System.Collections.Generic;
- using System.Linq;
- using Microsoft.Xna.Framework;
- using Microsoft.Xna.Framework.Audio;
- using Microsoft.Xna.Framework.Content;
- using Microsoft.Xna.Framework.GamerServices;
- using Microsoft.Xna.Framework.Graphics;
- using Microsoft.Xna.Framework.Input;
- using Microsoft.Xna.Framework.Media;
- using Microsoft.Xna.Framework.Net;
- using Microsoft.Xna.Framework.Storage;
- namespace ISO_Engine
- {
- /// <summary>
- /// This is the main type for your game
- /// </summary>
- public class Game1 : Microsoft.Xna.Framework.Game
- {
- GraphicsDeviceManager graphics;
- SpriteBatch spriteBatch;
- Vector2 cur_pos;
- Texture2D cur_txt, flr_txt;
- layer layers;
- public Game1()
- {
- graphics = new GraphicsDeviceManager(this);
- Content.RootDirectory = "Content";
- }
- /// <summary>
- /// Allows the game to perform any initialization it needs to before starting to run.
- /// This is where it can query for any required services and load any non-graphic
- /// related content. Calling base.Initialize will enumerate through any components
- /// and initialize them as well.
- /// </summary>
- protected override void Initialize()
- {
- // TODO: Add your initialization logic here
- layers = new layer();
- base.Initialize();
- }
- /// <summary>
- /// LoadContent will be called once per game and is the place to load
- /// all of your content.
- /// </summary>
- protected override void LoadContent()
- {
- // Create a new SpriteBatch, which can be used to draw textures.
- spriteBatch = new SpriteBatch(GraphicsDevice);
- // TODO: use this.Content to load your game content here
- flr_txt = Content.Load<Texture2D>("cube");
- layers.init(12, 12, 3, flr_txt, spriteBatch, GraphicsDevice.Viewport.Width, GraphicsDevice.Viewport.Height);
- cur_txt = Content.Load<Texture2D>("cursor");
- }
- /// <summary>
- /// UnloadContent will be called once per game and is the place to unload
- /// all content.
- /// </summary>
- protected override void UnloadContent()
- {
- // TODO: Unload any non ContentManager content here
- }
- /// <summary>
- /// Allows the game to run logic such as updating the world,
- /// checking for collisions, gathering input, and playing audio.
- /// </summary>
- /// <param name="gameTime">Provides a snapshot of timing values.</param>
- protected override void Update(GameTime gameTime)
- {
- // Allows the game to exit
- if (GamePad.GetState(PlayerIndex.One).Buttons.Back == ButtonState.Pressed || Keyboard.GetState().IsKeyDown(Keys.Escape))
- this.Exit();
- // TODO: Add your update logic here
- cur_pos.X = Mouse.GetState().X;
- cur_pos.Y = Mouse.GetState().Y;
- base.Update(gameTime);
- }
- /// <summary>
- /// This is called when the game should draw itself.
- /// </summary>
- /// <param name="gameTime">Provides a snapshot of timing values.</param>
- protected override void Draw(GameTime gameTime)
- {
- GraphicsDevice.Clear(Color.CornflowerBlue);
- // TODO: Add your drawing code here
- spriteBatch.Begin(SpriteBlendMode.AlphaBlend);
- {
- layers.draw();
- spriteBatch.Draw(cur_txt, cur_pos, Color.White);
- }
- spriteBatch.End();
- base.Draw(gameTime);
- }
- }
- public class cell
- {
- Vector2 pos;
- Texture2D txt;
- SpriteBatch sb;
- Color tint;
- public cell()
- {
- txt = null;
- sb = null;
- }
- public void init(int xval, int yval, Texture2D txt_name, SpriteBatch sprb, Color Tint)
- {
- pos = new Vector2(xval, yval);
- txt = txt_name;
- sb = sprb;
- tint = Tint;
- }
- public void draw()
- {
- if (txt == null)
- return; //nothing to draw if cell is empty
- sb.Draw(txt, pos, tint);
- }
- }
- public class layer
- {
- cell[,,] cells;
- int xsize, ysize, lcount, layer_height = 32;
- Color[] shade = new Color[] { Color.Gray, Color.LightGray, Color.White };
- public layer()
- {
- cells = null;
- xsize = 0;
- ysize = 0;
- lcount = 0;
- }
- public void init(int xSize, int ySize, int lCount, Texture2D texture, SpriteBatch sprb, int width, int height)
- {
- xsize = xSize;
- ysize = ySize;
- lcount = lCount;
- cells = new cell[lcount, xsize, ysize];
- for (int l = 0; l < lcount; l++)
- {
- for (int x = 0; x < xsize; x++)
- {
- for (int y = 0; y < ysize; y++)
- {
- cells[l, x, y] = new cell();
- cells[l, x, y].init((width / 2) + ((x - y) * 32) - 32,
- ((height / 3) + ((y + x) * 16) - 16) - (l * layer_height),
- texture,
- sprb, shade[l]);
- }
- }
- }
- }
- public void draw()
- {
- for(int l=0; l<lcount; l++)
- {
- for (int x = 0; x < xsize; x++)
- {
- for (int y = 0; y < ysize; y++)
- {
- cells[l, x, y].draw();
- }
- }
- }
- }
- }
- }
材质:
 |
|
|
|
|
|
|
|
|
|
|
|
楼主 |
发表于 13-6-2011 01:24 PM
|
显示全部楼层
别崇拜叔,叔只是传说。。。
我也是在摸索罢了,学无止境啊。 |
|
|
|
|
|
|
|
|
|
|
|
楼主 |
发表于 13-6-2011 04:34 PM
|
显示全部楼层
那就提醒你最重要的一点:记着防毒,Computer Lab绝对是万毒魔窟,功课要多储存几个副本,不然一旦中毒导致档案被删,那就欲哭无泪了。我曾经在提交Yearly Project的前一晚才赶完整个Project,匆忙存档后没有检查,结果第二天presentation时把磁碟插入电脑,找了老半天没有档案,后来证实Computer Lab大规模爆发病毒潮,我是受害者之一。幸好这次事件有迹可循,所以导师额外给予受影响的人两天时间来recover,不然那次我就顶多得 A D(Just a ‘D’),而不是AD(‘A’ Distinction)了。 |
|
|
|
|
|
|
|
|
|
|
|
楼主 |
发表于 14-6-2011 12:23 AM
|
显示全部楼层
开头的时候的确是很难看的懂那些参考书,毕竟你没有足够的知识去理解那些技术名词和原理。坚持下去吧,总有一天你会忽然开窍的。只要你用心的去看Lecture Notes(聊胜于无)和参考书,随着对那些技术的理解你会渐渐的明白的。不过当你开始懂得那些东西,你就会开始发现学的越多,懂得越少。。。
当我还是个电脑白痴时,我只知道我不懂得电脑。
当我开始懂得电脑时,我发觉我不懂得DOS。
当我开始懂得DOS时,我发觉我不懂得什么是电脑语言。
当我开始懂得电脑语言时,我揭开了潘多拉的盒子。
我不懂如何打破64KB的框框。
我不懂如何在荧幕上画线条。
我不懂如何播放音效。
我不懂如何读取键盘数据。
我不懂如何截取鼠标的位置。
我不懂什么是Interrupt。
我不懂如何读写640KB以上的记忆体空间。
我不懂很多很多。
我不懂什么是Windows。
当我学会什么是Windows,潘多拉再次找上门跟我推销另一个更大的箱子。。。
所以别想太多,因为你已经有太多不明白的东西了。。。哈哈哈 |
|
|
|
|
|
|
|
|
|
|
|
发表于 18-11-2011 12:53 PM
|
显示全部楼层
非常感谢!!大大的分享...
小弟最近也学习XNA....
你的教学...让我收益很多...哈!!哈!!哈!!
请继续你的教学...T。T |
|
|
|
|
|
|
|
|
|
|
|
楼主 |
发表于 18-11-2011 02:37 PM
|
显示全部楼层
欢迎讨论~ |
|
|
|
|
|
|
|
|
|
|
|
发表于 1-2-2012 09:32 AM
|
显示全部楼层
|
geekman大大,你好像很久没有上来了啊,是不是厌倦人少的这里了啊?哈哈。 |
|
|
|
|
|
|
|
|
|
|
|
楼主 |
发表于 4-2-2012 11:42 AM
|
显示全部楼层
|
|
|
|
|
|
|
|
|
|
|
发表于 4-2-2012 01:24 PM
|
显示全部楼层
回复 21# geekman
原来是这样?到底会是什么样的原因啊?哈哈。有机会说说看啊。 |
|
|
|
|
|
|
|
|
|
| |
 本周最热论坛帖子 本周最热论坛帖子
|


 变色卡
变色卡 千斤顶
千斤顶
 2262
2262  65
65